
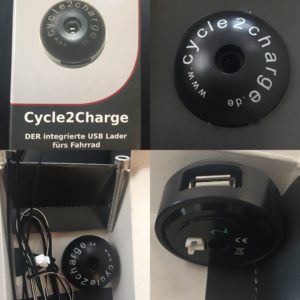
A week ago, the headset-cap USB adapter for my dynamo hub arrived. It is a solid piece of equipment, definitely not for somebody counting fractions of an ounce on their build, but sturdy enough to give me some hope that it’ll successfully endure the rigors of a long bike tour. In the box were all the pieces necessary for installation (adapter, bolt, wire, zip ties). The only additional things you might need are an allen wrench, a flashlight, and a pair of scissors.
My level of excitement over this purchase only goes to show just how nerdy I am.
I consider myself to be relatively technologically savvy, but I’m not in the habit of constructing or deconstructing things requiring wires. Even so, all told this installation only took me about 40 minutes, and that included searching for a flashlight then searching for a second flashlight when the first one nearly blinded me.
Step one, remove existing headset cap.
So far, so easy.
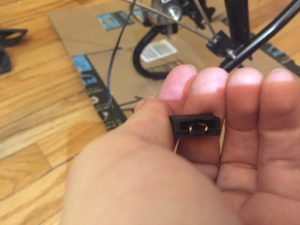
Step two, thread wire down stem through star fangled nut. (On a side note, is there a bike part that is more fun to say than star fangled nut? If there is, I haven’t discovered it yet.) This was probably the most difficult part of the installation. A star fangled nut looks like this:
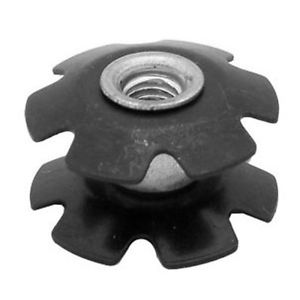
Notice how the openings on the edges are not completely lined up.
Some nuts have the edge openings lined up, but mine, like the one in the image above, does not. As a result, on my first attempt to thread the wire through I managed to coil the wire up between the two halves of the star fangled nut. This might have baffled me if it hadn’t been mentioned as a possibility in the installation instructions. They recommended shining a light up from the bottom of the stem to be able to judge the angle for threading.
No problem, I just had to move my fender out of the way and find a flashlight. I loosened the fender enough to get a flashlight pointing up the headset from the base of the fork and grabbed the nearest light. Unsurprisingly this was my bike’s headlight. This was a Very Bad Choice. Even with output drastically reduced by the star fangled nut, the light coming through was too bright for comfort. It took me a bit longer to find another light, but I did and soon had the wire threaded down the stem.
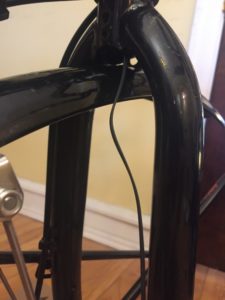
The adapter’s wire exiting from the fork
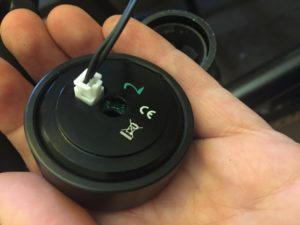
Step 3, thread the wires through the dynamo hub’s cap.
At the end of the wire, the two halves were split and the casing cut so all I needed to do to expose the copper ends was to pull the casing off. From there, threading the wires through was easy.

Wires inserted in the hub dynamo’s cap.
It was slightly more finicky to get them bent backwards and into the small hopes in the cap that would hold them in place, but that didn’t take more than a minute. Who knew the skills learned while threading needles for sewing and cross stitching would come in handy for electrical work?
The wires are bent back into small holes in the cap to hold them in place.
This was then wrapped around the fork a few times (to use up the slack) and zip-tied in place.
Step 4, plug in wire to adapter.
I don’t really have much to say about this step. That’s how simple it was.
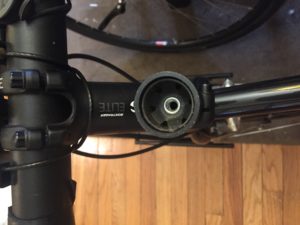
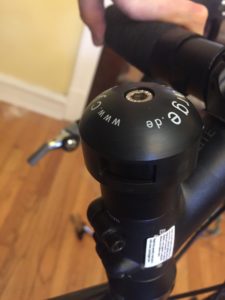
Step 5, bolt stem-cap adapter to bike.

Pick a direction for the USB port.
If possible, I recommend having a charging cable and device handy to test the arrangement of wires. You can point the USB port at any angle. I have an angled stem, so facing forward was out. For me, this angle points it to the side enough that I can plug in without the stem or handlebars getting in the way but not so far that the wire will have to turn at a sharp angle to get where it needs to go.

My edge touring plus plugged in and ready to go.
Step 6, Plug in and go!
One thing I really love about this device is that you can rotate the top to cover the USB port and protect it when not in use.
I’ve only been out on a few short rides since the installation (I might know it’s spring, but Mother Nature doesn’t seem to have caught on yet) but I’m quite happy with how it works. The charge starts (and cuts off) around 6 miles per hour, well below my average speed when loaded, although perhaps above my speed when loaded and on a steep climb… I’m definitely going to need a good battery capable of pass-through charging for the trip.
The one I bought, a GreenTek Mobile Lightning charger said it was capable, but it only works when the input is the micro-USB port (which is easy enough) and the output is USB-C. Bonus irritation, the provided USB-C to micro converter doesn’t work for this. Glad I tested it in time to return it and find a new solution.


John from New Apostolic told me to touch down with you..glad things are going smoothly..Beverly and John
I hope you have fun reading about the adventure.